How To Use These Paints
A complete beginner-to-advanced guide for achieving professional results with Kolor Factory special-effect paints.
What Kind of Paint Is This?
Kolor Factory paints are 1K acrylic-solvent basecoat special-effect aerosols — sometimes informally called 'solvent-based' or 'cellulose-type' in the UK trade, meaning they dry fast by air evaporation and are thinned with standard solvent reducer, but they are not traditional nitrocellulose paints. This is a category entirely different from the single-stage solid colours applied in car factories. Factory paint (OEM) is designed for uniformity, durability and automated application. Our paints are designed to create visual drama: colour shifts, deep translucent layers, pearl reflections and holographic glitter effects that simply don't exist in factory paint systems.
Factory OEM Paint
- Single-stage or two-stage solid colours
- Applied by robotic sprayers in booths
- Designed for UV resistance and longevity
- Opaque — hides everything beneath it
- No colour shift or light-reactive effects
- Matched precisely to vehicle colour code
Kolor Factory Special-Effect Paint
- Three-stage system: base coat → effect coat → clear coat
- Applied by hand with an aerosol or spray gun
- Designed for visual impact and creative custom work
- Translucent — the base coat colour shows through and affects the result
- Colour shifts under different light and viewing angles
- Infinitely customisable — no colour codes needed
Because our effect paints are translucent, the base coat underneath is not just a primer — it is an active part of the final colour. Choosing the right base coat is essential to achieving the visual effect you want.
Unlike factory paint, which typically requires a full professional respray to restore, special-effect paint systems are fully reversible. Because the finish is built in clear, separate layers, you can strip back just the top clear coat and reapply it to get a factory-fresh, glossy look again — without touching the effect or base coat underneath. Over time this is far more cost-effective than a traditional paint job, and means your custom finish can look new for years with minimal effort.
The Base Coat: Why It Matters
Unlike solid paints that cover whatever is beneath them, special-effect paints are semi-transparent. Light passes through the pigment layer and bounces off the base coat below. This means the colour you see is a combination of both layers. Using the wrong base coat can make an expensive paint look flat, dull, or nearly invisible.
| Paint Type | Recommended Base Coat | Why |
|---|---|---|
| Chameleon | Gloss Black | Black absorbs light and maximises the contrast of the colour shift. Over black the full spectrum of colour change becomes dramatic and vivid. Over other bases the shift will be washed out. |
| Pearl Paint | Gloss Black | Dark bases allow pearl particles to reflect light against a deep background, creating a rich three-dimensional shimmer. Over white the effect becomes much more pastel and subtle. |
| Candy Paint | Silver Metallic | Candy is a translucent dye layer. The silver underneath acts like a mirror, reflecting light back through the candy pigment and producing the characteristic deep, glowing colour. Over a non-metallic base candy looks flat and disappointing. |
| Ghost Finish | Gloss White | Ghost pearls are designed to create a barely-visible colour over white — the pearl particles create a halo of colour in direct light. Over dark bases the effect is masked entirely. |
| Fluorescent | Gloss White | White maximises the brightness and UV reactivity of fluorescent pigments. Over dark bases fluorescent colours appear dulled and lose their characteristic glow. |
| Holographic | Gloss Black | A dark base enhances the rainbow shimmer of holographic particles, making them pop against a deep background. |
Skipping the base coat or using the wrong one will not ruin the paint permanently, but you will not achieve the advertised visual effect. Many customers who apply chameleon directly over a white surface wonder why it looks almost clear — this is why. The base coat is not optional if you want to achieve that specific effect.
Choose Your Application Method
Using It Straight from the Aerosol Can
All Kolor Factory 400ml aerosols are ready to use straight from the can — no mixing, no equipment, no setup. Simply shake and spray. This method is perfectly suited to smaller items such as scale models, guitar bodies, helmets, bicycle frames and small panels.
- 1Shake the can vigorously for at least 2 minutes before use — the agitator ball inside must fully mix the pigment. Insufficient shaking is the single most common cause of uneven effects.
- 2Hold the can 20–30cm (8–12 inches) from the surface. Test your spray pattern on a piece of cardboard first.
- 3Use smooth, overlapping passes — move the can at a consistent speed across the surface before pulling and releasing the nozzle. Never hold the nozzle pressed while stationary.
- 4Apply multiple thin coats rather than one heavy coat. Flash off each coat for 5 minutes before applying the next.
- 5After use, invert the can and spray for 2 seconds to clear the nozzle. This prevents blockages for next use.
- Spray in temperatures between 15°C and 25°C — cold paint sprays poorly and warm paint runs easily
- Avoid spraying in direct sunlight or wind
- Warm the can slightly in warm water (not boiling) in cold conditions to improve atomisation
- Keep your wrist moving — the most common mistake is slowing down at the edges, creating heavy build-up
- If the nozzle blocks, remove it and soak in acetone for a few minutes
Using the Aerosol Spray Trigger Handle
Our Aerosol Spray Trigger Handle (available in the Accessories section) clips directly onto any standard 400ml aerosol can and converts it into a pistol-grip spray gun. This is ideal for large surface areas such as car panels or motorcycle tanks, where holding the aerosol button for extended periods causes finger fatigue and loss of control.
- 1Shake your aerosol can for at least 2 minutes to ensure the pigment is fully mixed.
- 2Hold the trigger handle with the nozzle opening at the top. Squeeze the side clips outward.
- 3Lower the aerosol nozzle into the centre of the applicator hole, aligning the nozzle tip precisely through the opening.
- 4Push down and rotate the locking collar to secure the can firmly. Give it a gentle tug to confirm it is locked.
- 5Test by pulling the trigger gently on a piece of cardboard before applying to your surface.
- Full-hand grip reduces finger and wrist fatigue on large areas
- More consistent trigger pressure means smoother, more even coats
- Helps avoid the common “too much pressure” mistake that causes runs
- Reusable — clips on and off, universal fit for all standard aerosols
- Ergonomic angle improves spray distance control
- Significantly reduces the risk of paint runs on vertical surfaces
Using a Spray Gun (Spray Gun Mix Products)
Our Spray Gun Mix products are designed to be used with a standard HVLP (High Volume Low Pressure) spray gun fitted with a 1.3–1.5mm tip. This method gives you the most consistent results on large surfaces such as full car panels, bonnets or motorcycle fairings.
- 1Prepare the gun: Ensure the spray gun and cup are clean and free of any previous paint residue. Any contamination will affect colour accuracy.
- 2Mix the paint: Shake the Spray Gun Mix concentrate and pour into the gun cup. Thin to the correct ratio (see Thinning Ratios section below) and stir thoroughly.
- 3Set your pressure: For most effect coats, 20–30 PSI at the gun is appropriate. Too high causes overspray and dry edges; too low causes orange peel texture.
- 4Test pattern first: Always spray a test card first and adjust the fan width and fluid control before touching your surface.
- 5Spray distance: Hold the gun 15–20cm (6–8 inches) from the surface. Move in smooth, overlapping passes — aim for 50% overlap on each pass.
- 6Keep moving: Never stop with the trigger pulled. Start your stroke before the edge of the panel and finish past it to avoid heavy build-up at the edges.
Thinning Ratios Explained
Thinning ratio refers to how much solvent (thinner/reducer) you add to the paint before spraying it through a spray gun. Paint straight from the tin is often too thick to atomise correctly. Thinning it creates a sprayable viscosity that produces an even, fine mist.
The ratio is expressed as Paint : Thinner. For example, a 1:1 ratio means equal parts paint and thinner.
| Product Type | Typical Thinning Ratio | Notes |
|---|---|---|
| Effect mid-coats (chameleon, pearl, candy) | 1:1 with reducer | Starting point — adjust if the mix feels too thick (add more thinner) or runs too easily (reduce thinner) |
| Base coats (black, silver, white) | 1:1 with thinner | Must be fully cured and dry before applying effect coat on top |
| Clear coat lacquer | Ready to use as an aerosol; thin 10–20% for spray-gun use | Apply in thin, even coats and let each flash off before the next |
| Aerosol products | Pre-mixed — no thinning required | Ready to spray straight from the can. Shake vigorously for 2 min before use. |
A simple test: dip a stir stick in the thinned paint and hold it up. It should flow off in a thin, steady stream. If it drips in thick blobs it needs more thinner; if it pours off like water it is too thin and risks runs.
Application Process
All special-effect paint jobs follow a three-stage system: Base Coat → Effect Coat → Clear Coat. The number of coats and technique vary by paint type.
- 1Apply 2–3 thin coats of gloss black base coat. Allow each coat to flash off (5–10 min) before the next. Let the final coat cure fully (30–60 min).
- 2Shake the chameleon aerosol for 2 minutes. Apply 2–4 thin, even mist coats. Flash 5 min between each. Consistency is critical — uneven coats will cause patches in the colour shift.
- 3Let the effect coat flash for 20–30 min, then apply 2–3 coats of clear coat lacquer for gloss and UV protection.
- 1Apply 2–3 coats of silver metallic base coat. A bright, highly reflective silver is essential — the shinier the better.
- 2Apply candy coat in 3–5 thin coats. Each coat deepens the colour. Flash 3–5 min between coats. More coats = darker, deeper colour.
- 3Final clear coat over the top (2–3 coats) seals the candy and provides the deep gloss associated with candy finishes.
- 1Apply black base coat (2–3 coats, fully cured).
- 2Apply 2–4 thin, even coats of pearl aerosol. Focus on consistent overlapping strokes — uneven pearl orientation causes visible mottling (patchy cloudiness).
- 3Clear coat with 2–3 coats of gloss clear lacquer once the pearl is fully flashed.
- 1Apply gloss white base coat (2–3 coats). Ghost pearls will not work over any other colour.
- 2Apply 2–3 very light mist coats of ghost pearl. Less is more — too much pigment overwhelms the effect and gives a flat appearance rather than the subtle shimmer.
- 3Clear coat carefully — the ghost effect is very sensitive to over-application.
How To Get a Dark, Deep Candy Shade
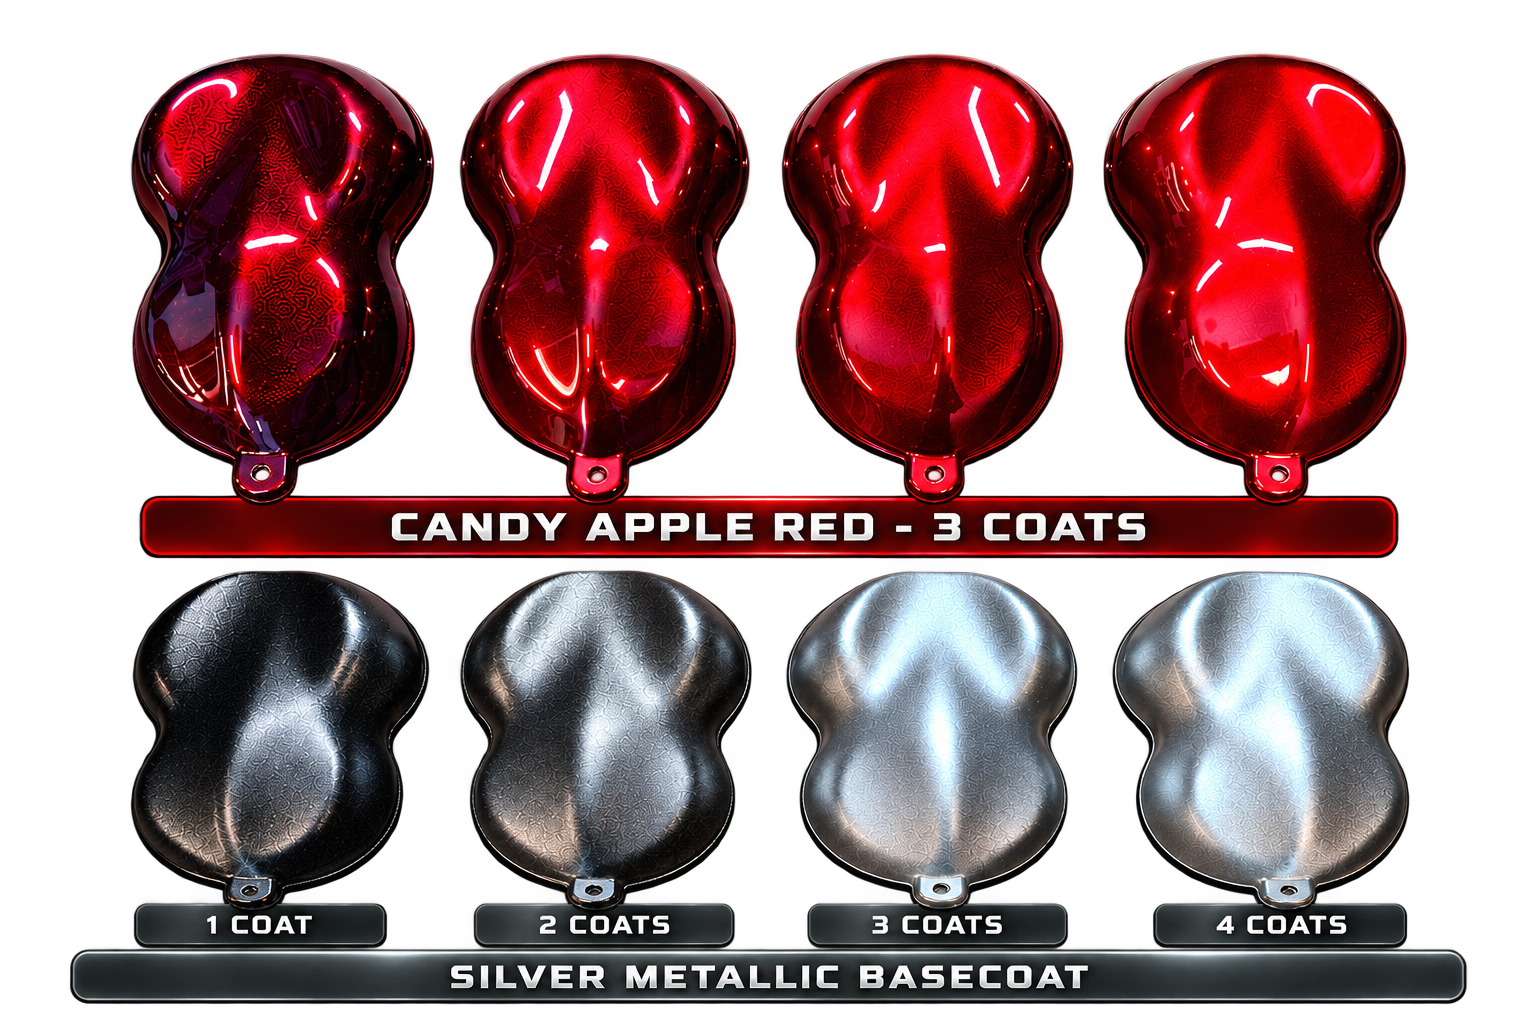
The Easy Way to Achieve a Dark, Deep Candy Shade
For a richer, deeper colour, begin with a black basecoat, followed by a metallic undercoat applied at approximately 50% coverage rather than a fully opaque layer.
This means applying just one or two light coats of silver metallic basecoat, allowing some of the black underneath to remain visible instead of completely covering it.
This technique creates a darker, more dramatic foundation, allowing you to achieve a deep, intense Candy colour with just two or three coats.
How the Candy Technique Works
Candy painting is a two-stage colour system that combines a reflective undercoat with a transparent coloured topcoat, producing exceptional depth, clarity and luminosity.
- 1The Undercoat — can be metallic, pearl or glitter-based. It provides the reflective foundation that gives Candy paint its distinctive appearance. The choice of undercoat, its colour and the amount applied all influence the final result.
- 2The Candy Colour — a transparent clearcoat or 1K basecoat containing specialised transparent automotive pigments, applied in thin, even coats to gradually build colour depth and intensity.
How the Number of Coats Affects the Final Shade
The final appearance depends on both the metallic undercoat coverage and the number of Candy coats applied.
- Less silver metallic coverage: more of the black basecoat remains visible, producing a darker, deeper finish.
- More silver metallic coverage: the surface becomes more reflective, resulting in a brighter and more luminous Candy finish.
- Fewer Candy coats: the underlying basecoat has a greater influence, creating a darker, more subdued shade closer to black.
- More Candy coats: the transparent colour becomes increasingly dominant, producing a stronger, richer shade closer to the Candy colour selected.
For example, when using Candy Apple Red, additional Candy coats generally create a more pronounced red appearance, while fewer coats over a dark foundation produce a deeper, almost black-red effect.
Increasing the number of Candy coats does not always make the finish lighter. Additional coats increase colour saturation and can eventually make the finish appear darker as light transmission decreases.
Explore Other Candy Colours
This technique is not limited to Candy Apple Red.
You can experiment with other Candy colours, including different shades of red, blue, green, gold, violet and orange, to achieve a wide range of unique finishes.
By adjusting the amount of metallic undercoat and the number of Candy coats, you can fine-tune the balance between darkness, colour intensity and reflectivity.
Even small changes in the application process can produce noticeably different results.
Professional Application Tips
For greater control and a more consistent finish, we recommend using a matt black base coat where appropriate. This allows you to apply thinner, faster-drying coats, helping to:
- Build colour gradually and evenly.
- Reduce the risk of runs and excessive paint build-up.
- Minimise patchiness, marbling and uneven shading.
- Achieve greater consistency across larger panels.
Professional painters often favour basecoat systems because they offer better control over colour development before the final clearcoat is applied.
Gloss Candy systems may eliminate the need for a separate clearcoat stage, depending on the specific product and its application requirements.
Always follow the manufacturer's instructions for mixing ratios, flash-off times, coat thickness and clearcoat compatibility.
For the most accurate results, we recommend preparing a test panel before painting the final surface.
Applying the Clear Coat
The clear coat is the final and arguably most important step. It locks in the effect coat, provides UV protection, creates the deep high-gloss finish, and gives the paint job its durability. Without a clear coat, special-effect paints will fade, scratch easily and lack the “wet” look depth that makes them visually stunning.
- 1Shake the clear lacquer thoroughly for a couple of minutes. It is ready to use straight from the aerosol; for spray-gun use thin by 10–20% to aid flow.
- 2Apply a light tack coat first — a thin, almost dry pass that creates a surface for subsequent coats to bite into. Allow 5 minutes flash time.
- 3Apply 2–3 full wet coats, flashing 10–15 minutes between each. A wet coat should look glossy and slightly wet when applied, not dry or powdery.
- 4Allow the clear coat to cure for a minimum of 24 hours before handling. Full hardness takes 7 days — avoid polishing or washing during this period.
- 5For a perfect finish, flat back with 1500 grit wet-and-dry paper after 24 hours, then compound and polish. This removes any orange peel texture and produces a mirror finish.
Think of the clear coat as a protective lens over the artwork. Without it, the effect pigments sit exposed to UV light, water and abrasion. The clear coat also dramatically deepens the visual effect — candy colours in particular look two to three times more vibrant under a wet clear coat than without one.